If you want to build multiple versions of an application from a single Xcode project, you would want to cerate multiple targets. For example, when you want to release a free version and also a paid version, you should create 2 targets in that Xcode project.
This tutorial will cover the how-to and the pitfalls in creating multiple targets.
1 Create a New Target
Lets assume we have an application call “Flowers”, which is a paid version. And we would want to create a lite version that has some reduced functionality but is free. It is to note that both the paid version and lite version would share the same code, with only some differences.
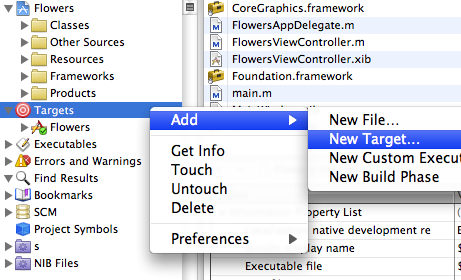
Firstly, create a new target. Under Groups & Files, right click on Targets > Add > New Target (Figure 1 below).
Select Application as the new target template.
Enter “FlowersLite” as the target’s name.
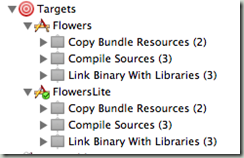
Pitfall: When a new target is added, it would not copy over any resources, compiled sources or libraries from the original target! You would need to copy them over manually (drag and drop from Flowers to FlowersLite). If you copy all correctly, you would see figure 2 below. The numbers in brackets indicate number of files, hence they should be the same for both the targets.
2 Info.plist
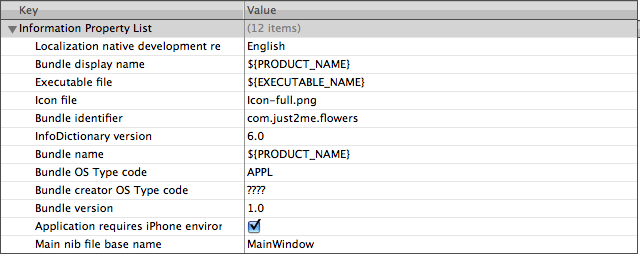
We could define properties, such as application name and icon files, for each of the target. Figure 3 below shows “Flowers-Info.plist” for the full version.
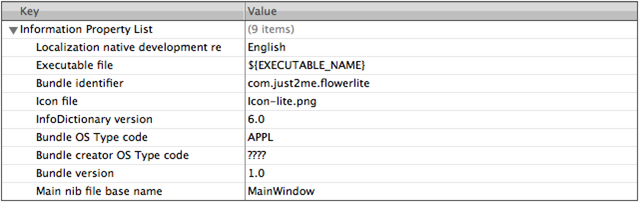
For the lite version, the “FlowersLite-Info.plist” could be changed as necessary. For example, the bundle identifier for the lite version could be “com.just2me.flowerslite” and the Icon file could be “Icon-lite.png” instead (as in figure 4 below).
3 Writing Preprocessor Codes
Preprocessor codes are used to determine which code would be used during compile time. You may want different targets to run different section of the codes using preprocessor codes. For illustration, we will add a LITE_VERSION definition to the lite version.
Under Targets, right click FlowersLite > Get Info.
Change Configuration to “All Configurations” (this is important).
In the Preprocessor Macros field, add the flag LITE_VERSION (see figure 5 below). Note: If you don’t see the section “GCC 4.2 – Preprocessing”, change the active SDK to base SDK and try again.
![]()
With the flag LITE_VERSION defined, we could now write codes that will be compiled for the different targets. An example is shown in figure 6 below.
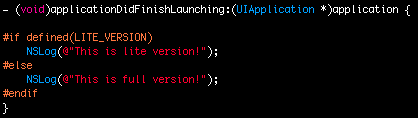
When the active target is selected and being run, it will work and print correctly.
4 Managing Resources
You could copy different resources (having same name but different) to the targets. Resource could refer to xib files, images, etc.
For example, if the lite version has a different default loading screen, you could create another Default.png for the lite version. Note: To make it work, you have to copy the correct Default.png to that target’s “Copy Bundle Resources”, and also to remove the incorrect Default.png.
5 Build for Distribution
When you are ready to compile the application for submission to iTunesconnect (release distribution), there is one last important thing worth checking.
It was pointed out in section 3 (Writing Preprocessor Code), that you have to change the configuration to “All Configurations” before you make any changes to the target properties (in this tutorial is adding the LITE_VERSION flag). That is important as the same flag is needed for all configurations, including distribution.
PS: I am stressing this last step as I had made this mistake.. and it resulted in my lite version being released as a paid version because the LITE_VERSION flag was only set for Debug, and not for Distribution!! I did not realize this mistake when compiling for Distribution, as I could only compile the app but not run it on simulator/device..